Difference between revisions of "Laser Cutter"
| Line 80: | Line 80: | ||
##Press "Frame" to outline your job and check that it fits | ##Press "Frame" to outline your job and check that it fits | ||
##Close lid then run job | ##Close lid then run job | ||
| − | |||
#After cut is finished allow ~30 seconds before opening to vent smoke/fumes | #After cut is finished allow ~30 seconds before opening to vent smoke/fumes | ||
Revision as of 13:31, 8 February 2021
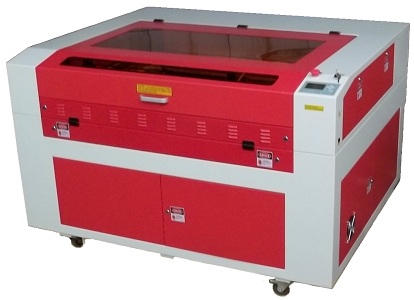
| Rabbit QX-80-1290 Laser engraving/cutting machine | |
|---|---|
 Rabbit Laser Cutter | |
| Technical Specifications | |
| Bed Size | 1200 x 900 mm (47.2 x 35.4 inches) |
| LASER Power | 80W |
| LASER Type | Sealed CO2 laser tube |
| Max Bed Height | ~10 inches |
| Max Cut Speed | 300 mm/s |
| Max Engrave Speed | 600 mm/s |
| Max Engrave Resolution | 1000 DPI |
| Additional Information | |
| User Manual | RL-80-1290_User_Manual.pdf |
| Website | Rabbit QX-80-1290 Product Page |
The Laser cutter cuts or engraves digital designs on a variety of materials. Laser cutting is a great way to rapidly prototype projects.
An authorization workshop, hosted by an approved instructor, is required of all members before using the laser cutter. Workshops are posted on the calendar. Peer authorization is not an approved path for use of the laser cutter.
Interfacing with the laser cutter is performed with Lightburn.
The laser cutter does require regular cleaning and alignment. This is to be performed by trained volunteers only.
Contents
Usage
Safety
Fire Safety
Laser cutters pose a fire hazard. A high intensity beam of laser light can produce extremely high temperatures as it comes into contact with the materials it is engraving, marking, or cutting. When using the laser cutter, remember:
- You may only use the laser cutter if you have been officially authorized according to the machine access policy
- Never leave the laser cutter unattended while it was powered on (even if it is not firing)
- Never cut materials that you don't know are safe
- Never override laser cutter safeties and switches
- Know what to do if a fire happens
- Move the head out of the way, if it's small.
- Hint: Hit the big, red, emergency stop button. This will shutdown the laser and the air supply
- A Carbon Dioxide (CO2) fire extinguisher is located next to the laser cutter
- Verify it is out and then:
- Place a note that a fire occurred and the machine is out of service.
- Post on the forum about it, or send an email to fablab@makeict.org
- Someone from the laser group will check the machine, clean as necessary, and put it back into service.
Eye Safety
The laser is encased and will not fire unless the doors are shut. Do not bypass any safety lockouts or open panels without consulting the fablab lead first. Lasers can cause serious eye damage, even indirectly through scattered energy.
Air Safety
Many materials give off toxic fumes when cut. Do not cut unapproved, unknown or banned materials on the laser cutter. See the list of approved/banned materials on this wiki
Starting the laser cutter
- Press power button and scan your keycard
- Make sure the air compressor, blower fans, and chiller are on
- Machine will automatically home
- Beware of flammable materials while using the machine
Workflow
A detailed step-by-step presentation of LightBurn is available here: Lightburn
- On any computer
- Do not create your designs on the computers connected to the lasers
- LightBurn accepts the following file types:
- Vector: .svg, .ai, .pdf, .dxf, .hpgl, .plt,
- Raster: .bmp, .jpg, .jpeg, .png, .gif, .tif, .tiff, .tga
- Project files: .rd, .lbrn
- LightBurn
- Import your file into Lightburn:
- Separate operations into different layers for each speed and power setting
- Save as .lbrn file
- At the laser cutter computer
- Check the calendar http://makeict.org/lasercutter to make sure you're not running into a reservation
- Start LightBurn
- Turn on the machine
- Turn on the laser cutter using your badge and the green button
- Wait for homing sequence to complete
- Press Z/U on control panel and use left/right arrows to lower the bed until your material will fit under the head
- Load media into cutter
- Jog head to center of media using control panel
- Focus to the top of the material
- Move laser to desired starting point
- Set Origin if desired
- Press "Frame" to outline your job and check that it fits
- Close lid then run job
- After cut is finished allow ~30 seconds before opening to vent smoke/fumes
When Finished
- Home the head
- Remove media and clear debris
- Power off
Rotary Axis
If you are using the rotary axis, refer to this page
Troubleshooting Guide
- Bed only travels downwards
- Wiggle the probe and make sure its not jammed
- Check to see if the upper z-limit switch is stuck
- If none of these work, notify the fab lab team fablab@makeict.org
- Lines are cutting fuzzier and thicker than normal
- Make sure you ran the autofocus
- Try focusing the laser cutter by hand if you like and notify the fab lab team fablab@makeict.org
- The laser doesn't fire
- Open the door and reclose (the door switch might be flakey)
- Check the door switch to make sure it is not broken (Close the lid. Look at the power supply. P0 on the power supply is an indicator of it being broken. A0 means it is ok. The power supply is in the left side of the cabinet behind the lower left door would indicate this is the case.)
- Edges of cut pieces are slanted, rather than straight.
- The Laser is out of alignment and needs to be adjusted, notify the fab lab team fablab@makeict.org
- Fumes are not venting well.
- Stop cutting
- Ventilation fan needs to be cleaned, notify the fab lab team fablab@makeict.org
- The head hits the side of the machine. "Hard Limit Prot." error displayed on panel
- Head position has been lost and the head has hit a limit switch. Reset the machine. If this continues to happen notify the fab lab team fablab@makeict.org
- Can't run file, "Frame Slop" error displayed on panel.
- The file is going to run off one of the edges of the machine. Change the starting position and/or resize your file so that it fits on the bed.
Speed and Power Settings
Every material and sometimes even every day is different, but here are some starting points:
| Material | Power (%) | Cut Rate (mm/s) |
|---|---|---|
| Masonite - 3/16" | 50% | 20 |
| Plywood - 6mm | 50% | 15 |
| Cardboard | 50% | 50 |
| Engraving | 2-30% | 300-600 |
It is always highly recommended that you do some small test cuts/engraves before running your full design, especially if it is large or uses valuable material and/or you haven't lasered it before. This can save you a lot headaches.
Materials
Cutting a bad material in the laser cutter can be dangerous. Only approved materials should be cut, and banned materials should never be placed in or even around the laser cutter. Cutting an unknown material risks bodily harm and damage to equipment/facilities.
Approved materials
| Name | Notes | Warnings | |
|---|---|---|---|
Acrylic (aka Plexiglas, Lucite, PMMA) |
Cuts well, leaves a smooth polished edge. Higher powers can leave smoke/scorch marks along edges. Some people remove paper/plastic protection sheets before cutting. | ||
Cardboard |
Cuts well, can catch fire | FIRE hazard! | |
Ceramic |
Engraving only | Mirror surfaces can reflect the laser beam | |
Cloth (cotton, felt, hemp) |
Cuts easily | NO plastic coated or impregnated cloth! | |
Corian |
|||
Cork |
Cuts nicely, the quality of the cut depends on the thickness and quality of the cork. Engineered cork has a lot of glue in it, may not cut nicely. | ||
Coroplast (corrugated plastic) |
Difficult to cut through cleanly, due to the ribs. Multiple passes are usually needed. | ||
Delrin |
Comes in a number of shore strengths (hardness), the harder tends to work better. Great for gears! | ||
Glass |
Has a sandblasted look, #009900 glass works best | Mirror surfaces can reflect the laser beam | |
Leather, suede |
Leather is very hard to cut, can be if thinner than a belt thickness | ||
MDF, engineered woods |
May experience a higher amount of charring when cut | ||
Magnetic sheet |
Cuts easily | ||
Stone/Granite/Marble/etc. |
Engraving only | Mirror surfaces can reflect the laser beam | |
Matte Board |
|||
Melamine |
|||
Mylar |
Works well if it's thin. Thick mylar has a tendency to warp, bubble, and curl | Gold coated mylar will not work | |
Paper, card stock |
|||
Plywood, composite woods |
Contain glue, and may not cut as well as solid wood | ||
Pressboard |
|||
NON-CHLORINE Rubber |
DO NOT CUT unless the rubber compound has been tested | Beware chlorine-containing rubber! If you're not sure, assume you've got chlorinated rubber, and don't cut it. | |
Tile |
Engraving Only. | Mirror surfaces can reflect the laser beam | |
Wood |
Avoid oily/resinous woods | FIRE - Cutting oily woods, or very resinous woods can catch fire. | |
Wood Veneer |
Contain glue, and may not cut as well as solid wood | ||
Anodized Aluminum |
Engraving only. Vaporizes the anodized layer away | ||
Bare Metals |
Engraving only. | ||
Brass |
Engraving only. | ||
Coated Metals |
Engraving only. Vaporizes the coating away | ||
Painted Metals |
Engraving only. Vaporizes the paint away | ||
Stainless Steel |
Engraving only. | ||
Titanium |
Engraving only. | ||
PolyPropylene Sheet |
NOT FOAM | ||
PolyStyrene Sheet |
NOT FOAM | Tends to melt; avoid overheating. |
Banned materials
These materials should never be processed in the laser cutter. This list is not exhaustive.
| Name | DANGER | WARNING |
|---|---|---|
ABS (acrylonitrile butadiene styrene) |
Emits cyanide gas and tends to melt | ABS does not cut well in a laser cutter. It tends to melt rather than vaporize, and has a higher chance of catching on fire and leaving behind melted gooey deposits on the vector cutting grid. It also does not engrave well (again, tends to melt). |
Chlorinated plastics (PVC/Poly Vinyl Chloride, vinyl/pleather/artificial leather) |
Emits pure chlorine gas when cut! | Don't ever cut this material as it will ruin the optics, cause the metal of the machine to corrode, and ruin the motion control system. Bubbles yellow, smokes alot, STINKS!!!!! |
Coated Carbon Fiber |
Emits noxious fumes | A mix of two materials. Thin carbon fiber mat can be cut, with some fraying - but not when coated |
Fiberglass |
Emits fumes | It's a mix of two materials that cant' be cut. Glass (etch, no cut) and epoxy resin (fumes) |
Galvanized metal |
Emits dangerous fumes | Zinc fumes are poisonous. Galvanized metal should never be super heated (so don't weld on it either). |
Metal |
Power needed for LASER to cut metal | |
Milk bottles/HDPE |
Catches fire and melts | It melts, gets gooey. DON'T. Someone has to clean the hex worktable. |
Mirrored surfaces |
Will not cut, reflects laser beam | Mirror surfaces can reflect the laser beam, damaging the cutter's interior components. Some mirrored materials can be placed reflective-side down and cut. |
Polycarbonate/Lexan |
Cut very poorly, disbackground-color, catch fire | Polycarbonate is often found as flat, sheet material. The window of the laser cutter is made of Polycarbonate because polycarbonate strongly absorbs infrared radiation! This is the frequency of light the laser cutter uses to cut materials, so it is very ineffective at cutting polycarbonate. Polycarbonate is a poor choice for laser cutting. |
CDs, DVDs, Blu-rays, etc. |
Made of Polycarbonate. | |
PolyPropylene Foam |
Catches fire | Like PolyStyrene, it melts, catches fire, and the melted drops continue to burn and turn into rock-hard drips and pebbles. |
PolyStyrene Foam |
Catches fire | Like PolyPropylene. It catches fire, it melts, and only thin pieces cut. This is the #1 material that causes laser fires!!! |
Pressure treated wood |
Emits dangerous fumes | Should never be burned -- not in your fireplace, and definitely not in our LASER |
Printed circuit board (FR4 and other material types) |
||
Unidentified plastics/rubbers |
If you don't know what it is, don't put it in the LASER cutter | |
Plastics from The Yard Store |
They do not properly identify their plastics |
Links & Other Resources
- Laser Cutter Reservation Calendar
- Designing for the laser cutter
- Laser Authorization Class Slides
- Rotary Class Slides
- Thingiverse Laser Cut projects
- Identifying Unknown Plastics by Make Magazine
- Beilstein test
- Polymer Identification (video) by Burnination
- Polymer Identification (PDF) by David A. Katz
- Density Column Using Recyclable Plastics

