Difference between revisions of "How to use a multimeter"
(Added a picture and text dealing with ohms measurments.) |
Brad Cozine (talk | contribs) m |
||
| Line 14: | Line 14: | ||
Let's talk about the upper right side of the meter. dat dere is the VOLTS section it's going to give you the voltage of the red wire, compared to the black wire. | Let's talk about the upper right side of the meter. dat dere is the VOLTS section it's going to give you the voltage of the red wire, compared to the black wire. | ||
| + | [[Category:Electronics]] | ||
Latest revision as of 02:46, 8 May 2022
Basic Multimeter usage
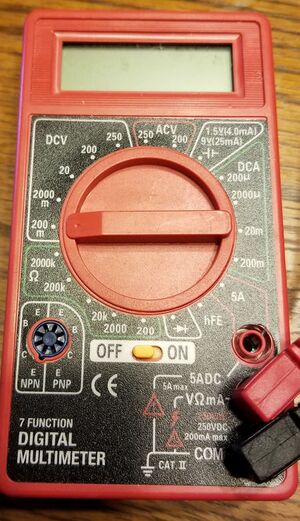
So you think you need a multimeter. You are probably right! A multimeter is a device that has multiple meters in it. The first thing you should reach for is the Cen-Tech digital multimeter. These are pretty inexpensive from harbor freight, sometimes free with the right coupon. There is a big yellow switch in the middle of the meter.
If you are using the meter it should be switched to on, if you are not using the meter is should be switched to off.
I know your thinking, "well of course, who wouldn't switch it off when they are done". But the next time your using it, you get home and realize. You did the thing.
So switch it on and if there is numbers on the display then it probably works. If you pick it up, and it's switched on and there are no numbers on the front, Someone else did the thing, don't use that meter.
In the middle is a big ol dial. if you don't see it, turn it over and try the other side. Should be the side with the display. One end of that dial has a lil divot in it. That's your indicator, that's what it is pointing at. take that divot and turn it straight down. Should point at 200m. That there is a resistance measurement. If there ain't no wires plugged into the holes in the meter, Plug a red one in VΩmA (middle hole) and a black one in the bottom hole marked COM. Touch the ends together, should read close to zero. if it doesn't try a different wire sets. Those wiresets with the plug on one end and the metal spike on the other are called test leads. That's what you use to poke around stuff with. With the meter set like this, if you took a resistor, put the red lead on one metal wire, and the black lead on the other metal wire it's going to either show you a number, or it's going to say "1 . " if it says the number, and the number is positive, it's likely that's the resistance. Sometimes it can get confused, so you may want to turn it to the arrow spot or hfe and back. If it gives you the second answer your resistor may be over 200Ω which you will want to kick it up a notch. Each 'notch' is called a range. You can move it to the 2000k range but a 10ohm resistor isn't going to get a good reading. If you try to measure a 1000k resistor in the 200 range, it's going to give you nothing. So that's the spot there in green with the Ω symbol in the bottom left. How it takes this measurement is, it puts a little bit of electricity through your device and measures the current and voltage. Voltage divided by current is Resistance... we measure this in Ω. You need to know that because if you try to measure Ohms, while your circuit is powered on, your meter is going to be confused at best. So don't do that. But if you remove a part and want to check to see it's resistance, That's what an ohms measurement...do.
Let's talk about the upper right side of the meter. dat dere is the VOLTS section it's going to give you the voltage of the red wire, compared to the black wire.
